My Cart
0
$0.00
Your cart is currently empty
Brain tanning method for leather tanning is one of the oldest methods still in use. But this method is almost forgotten today and is rarely practiced. It is labor intensive and offers a smelly process. This method is a way of preserving the skin by using smoke.
You can use the hides of all types of mammals for the brain tanning method. Of course, this process takes a lot of work. But the end product is an exceptionally soft hide that remains pliable even after it gets wet. So, let's learn more about tanning a hide with brains.
The brain tanning leather process is the oldest. In this process, dehaired hides are soaked in natural fats and enzymes of animal brains. The connective tissues have been broken with the help of this. That is why it is named brain tanning. After breaking down the connective tissues, the hides are soaked and stretched to dry. To finish them, the hides then soaked over a smoldering flame. The smoke gives the hides their very distinct scent.
Brain tanning is a time taking process, and it needs patience as well. Some types of brain tanning processes use artificial versions of chemicals. This process helps to tan a hide with brains in much larger batches.
The leather made with the brain tanning method is more expensive than other types of leather. However, with the brain tanning method, the leather becomes more durable. It creates a very soft hide that will last for generations. The leather looks and feels better the more you wear this.
Brains for tanning hides are a speedy process. This method was readily available after the animals were killed. The process takes only a few days. The brain tanning method has low technical effort. This is why it is easy to make the leather soft. The brain tanning method involves 100% natural products.
Brains for tanning hides are high in the manual labor process. It is not as easy compared to other tanning methods. Everything from the skin layers of the hair side to fat and flesh remnants of the back should be removed. This will help the brain to penetrate the fibers fully. This ensures the leather gets beautifully soft. A considerable effort is needed to press the brain mass on their fine.
You cannot just store this hide anywhere; it is traditionally stored in a special tent over wood smoke. This is what ensures the long-lasting softness of the leather. The smoke gave the leather a dark brown tone and made it weatherproof. The leather turns out to be whitish and water sensitive without this process. Next, one should remove the fat and meat remnants. If dry scraping is not done with care, it can damage the skin. The dry scraping is from left to right and from top to bottom.
A lot of work is needed to make the hide soft and pliable. However, the brain tanning hides process is gratifying and only takes a few days.
Step 1: Evaluating and trimming
Evaluating and trimming is the first step to preparing your hide to be worked. There is a lot of work needed to tan a hide. It would help if you started with high-quality hide without any holes. It would help if you looked for knife marks that penetrate the very layer between the skin and flesh.
A hide with a hole is not ideal unless all you want to make is lashing. The next thing you must do is trim off any dangly bits and the thickest part of the neck. As these areas are hard to work with, it's best to eliminate them immediately.
Step 2: Time to flesh
Once your hide is trimmed up nicely, it is time to flesh the hide. To do that, you need to spread your hide on the beam. Just make sure that the hide is flat and not folded. Next, you will need a scraping tool to remove all the flesh. Start by scraping all areas at a time with your scraping tool.
Step 3: Soaking the hides
Soaking Is a process of controlled rotting. It is done after fleshing the hides. Soaking will loosen the hair and softens the membrane layer. This will be the best part you scrape off. While soaking the hide, use a bucket with a rock to weigh it down.
You must agitate the hide a couple of times a day if you use a bucket. Depending on the temperature of the water, the soaking process will take between 2 days and a couple of weeks. The process is done if you can easily pull the hit out of the hide with a firm tug.
Step 4: The scrape of the hide
Every animal's skin has layers of various kinds of tissues. You must scrape off the above and below the leather to turn it into leather. A layer of grain is beneath the hair that holds in the game. You need to scrape off that part. The grain is tough to see as it is attached to the hide. This is why it is very tricky to get all the grain off.
Your approach needs to be methodical to yield success. Start with scraping a small area at a time. Then, you can start scripting in the middle of the hide. If you scare from an area with no grain into an area with the grain still attached, it will be easier for you. After scraping off the hide, now it's time to let it dry. This process will become clear as you learn how to tan a hide.
Step 5: Membrane And Wringing
After scraping and drying, you hide; now it's time for the membrane. Before you start this step, rehydrate a dry hide. Then use the same systematic approach and remove the other side of the hide to remove the membrane. The next step is to correct the amount of moisture you can. You don't want a dripping hide with dark, wet spots, not want a crunchy, bone-dry hide. The hide should be dry, soft, and pliable but barely damp.
Step 6: Soaking Your Hide-In Brains
It is the brain of the operation. To create your tanning solutions, the fat, and lecithin in the brain make it ideal. You can always use egg yolks if you don't have brains. Even though they have fat and lecithin, they don't quite have the magic or gross was of brains.
First, make a warm oily solution and submerge your hide in it. To make sure the whole hide is saturated, stir a bit. You can soak it for 15 minutes or as long as overnight. Next, you have to pull the hideout and wring it out. While wringing it, leave as much of the solution in the bucket as you can. Then, depending on your stamina, you must soak and wrong it again about 2-4 times. This will help the brain solution to penetrate through the whole hide.
Step 7: Softening
The braining is done, now comes softening. This labor-intensive part help to prevent your hide from becoming hard like rawhide. You must keep the fiber moving throughout this final drying. Stretch the hide like you were trying to pull it apart from side to side, lengthwise, and the edges. You can stretch, cable, stake, bounce, rub, and smack the hide throughout the softening process. Also, there are some techniques to keep those fibers moving as the hide dries.
Step 8: Smoking The Hide
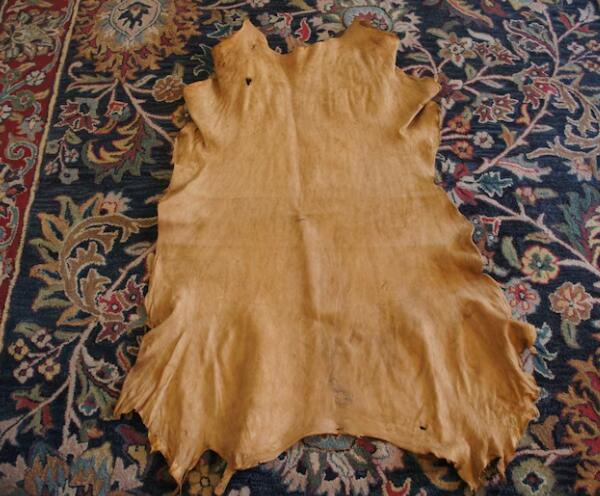
Once the hide becomes dry, it's time to smoke the hide. This final step will help the leather soft in all kinds of weather. Even though the hide feels soft become smoking but it will become stiff and hard as soon water touches it. This is why you smoke it to keep it soft. Smoking will turn your hide into a lovely amber color.
You must turn your hide into a pouch with one open end at the neck to smoke it. You can use glue, staples, or stitching to do this. Then, with a tube made of cloth, extend this pouch. This helps the hide fit snugly over your smokey coals' outlet.
Building a fire using lovely hardwood to fill in an old wood stove would be best. The fire should be burned for 30 minutes to an hour. This way, there will be a good-sized bed of coal to accumulate. You must transfer some hot coals into your wood stove.
Add punky wood on top of those coals to create a lot of smoke. Then hand your hide on the coals so the smoke goes into it. This smoke will penetrate the hide fully. Next, smoke the membrane sides of your hide by flipping the pouch inside out. You are done when more penetrate the outside of the hide.
Leather that is tanned in the juices and chemicals of the animal's blood. The brain tanning process is traditional in some indigenous American communities. The hide comes from various animals. This is why its use and price also vary depending on those factors. However, there is a long tradition behind brain-tanned leather.
The brain tanning process is a traditional process to make leather. For years upon years, the native Americans and other indigenous cultures have been using this process. Brain-tanned leather is soft and easy to wear. In addition, this has been a part of regalia and cultural garb for years and years. Therefore, this method is favorable as everything you need to tan your hides is available in the animal.
Many people do not like the odor that comes from the brain-tanned leather. Brain-tanned leather tends to have a solid smokey odor due to the smoking process. If you cannot deal with the scent, then air it out for a bit. You could hang it on a porch or in the garage. You must leave it for a few days to mellow down. This will help the smell to wear away entirely.
Brain-tanned leather is exceptionally soft and supple. It remains soft even after it gets wet. The leather from brain tanning hides is comfortable, durable, and breathable. This leather has been used for traditional leather and fur products. It is used as a fur product as, in some cases, the hair is not removed from the animal hide.
Because of the labor and complexity involved, commercial brain tanning does not use the same process as traditional methods. As a result, brain tanning leather is more expensive. However, it is high quality and rare. In addition, the hide of animals used to make this leather is usually hinted. This is why the supply of hide is limited, making it expensive.
Brain-tanned leather has a lot of variations. It all depends on the animal hide used for the leather and the brain tanning method. The color of the leather changed due to the smoking process. If not smoking, it will have a white or light color. Commercial-tanned leather is generally soft and has a distinct appearance. It is more consistent than the traditional method.
The leather made by tanning a hide with brains is soft, stretchy, and strong. The products won't get ruined when it gets wet. It can be laid out to dry and not turn stiff as a board. One thing to keep in mind is that this leather will not keep you dry. Bring tanned leather can be used for many projects.
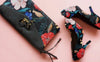
This type of leather is perfect for shoes, bags, and fringe. It is lightweight and breathable leather which makes it preferable for clothing. Due to the smoking process of the hides, the leather gains a lovely golden color, too; if you don't need leather to have structure, brain-tanned leather works just for any project.
Elk leather is soft and stretchy and best used for clothing and bags. On the other hand, leather from moose is thick and dense and suited for moccasins. It is better for products requiring thicker and more durable leather. Leather from buffalo works well for bags. The leather from fox and wolf far is durable and suitable for ornamental purposes. The leather from rabbit skins can be cut into strips and knit into a jacket or cape.
The brain tanning method is quite different from vegetable tanning. Like brain-tanned leather, the vegetable-tanned product also takes many months. Vegetal products use high-quality hides resulting in the product becoming expensive. On the other hand, vegetable tanned gives a natural finish, so the product develops a beautiful pattern. Vegetable leather is stiff and rigid. Brain-tanned leather also displays a natural pattern. But the leather made with brain tanning is soft and supple.
During the bring tanning process, the hide must go through the smoking process. This often leaves a strong smell of wood smoke. You can reduce this smell. You can reduce the smell of smoking by repeatedly soaking and washing with soap and water. But asking frequently will affect the softness of the hide. The leather will become very stiff after washing and drying. You can use cornmeal and a clean brush to clean brain-tanned leather.
The brain tanning method has been on the decline for a long time. Brain-tanned leather is one of the highest-tanned leather out there. In the process, there are so many steps involved. This could be why this craft gave way to modern tanning methods. There are people out there who try to keep the tradition alive. They are making an effort to teach the practice. These people also sell brain-tanned leather products to consumers looking for more naturally tanned leather options.
If you are looking for leather for traditional crafts, leather from the tanning process is for you. The brain tanning method requires specialized skills. It is an intimate and labor-intensive process. Therefore, the leather from brain tanning is valuable and not for everyone.
Brain-tanned leather is soft and supple and has a novelty value, so it isn't easy to get genuine brain-tanned leather. Instead, bring tanned leather with a unique beauty that has been loved for centuries. It is suitable for clothing and items that hold a special meaning for you.
Shop our collection of:
Leather Portfolio | Leather Journal | Leather Backpack | Canvas Backpack | Leather Laptop Case | Personalized Leather Planner | Leather Notebook Cover | Leather Pencil Case
Related Posts: